
In the first part of our guide to soundproofing a room, we’ll tell you everything you need to know to make your room quieter and also to keep noise from transferring outside. Soundproofing doesn’t have to break the bank and we’ve got some tips for every budget.
In this article, we cover the basic techniques you can use to make your room more soundproof. Besides these basic techniques, we also explain how to soundproof a wall.
You might require some basic DIY skills, but you don’t have to spend as much money as some acoustic companies would have you believe.
You can use the quick links below to navigate to your place of interest.
Some of the links below are affiliate links, meaning, at no additional cost to you, we may make a commission if you click through and make a purchase.
[spacer height=”20px”]
Contents
Soundproofing Basics
In today’s claustrophobic cities, soundproofing your home has never been more important.
With some basic DIY, it is actually possible to remove the sound of the buzzing scooters, the noisy neighbor next door, or even the nearby train line.
Furthermore, if you’re a musician, a bit of soundproofing work can stop those noise complaints, and leave you free to perform whenever you want.
By reducing the noise coming into (and out of) your home, you can substantially increase your quality of life.
Soundproofing isn’t as difficult or as expensive as you might think. Using some basic science, we can target the noises we want to reduce or remove, and create a tailor made solution to our own noise problems.
Luckily, the science isn’t complicated and I can talk you through the whole process step by step. Let’s start by learning about each of the ways we can stop noise from traveling.
[spacer height=”20px”]
We’ve already mentioned two reasons for treating a room: keeping unwanted sound out, and keeping sound in. The process for each of these reasons is similar. In short, we want to stop vibrations (sound) from traveling through surfaces like walls.
There are 4 key ways to stop unwanted sound from traveling like this:
- Absorb Sound
- Add Mass
- Dampen Sound
- Decouple Surfaces
Let’s take a look at what these things mean, and how you can implement them in your home. Here are 4 ways to soundproof a room.
[spacer height=”20px”][spacer height=”20px”]
1. Absorb Sound
Sound waves will retain more of their energy when traveling the path of least resistance. For example, sound traveling the same distance through the air, will be louder to your ears than a sound that has passed through a wall.
There are probably gaps in your room where sound can easily enter. So how do we find these “holes” in your room?
Imagine your room was flooded with water, right up to the ceiling (stay with me here, there’s a point to this).
Now picture where the water would leak out of your room. Windows, the bottoms of doors, power outlets, vents…. These “holes” in your room are prime locations for sound to leak in or out of your apartment. By treating these weak points we can reduce the noise entering/exiting your home.

How to Treat a Room For Air Gaps
We mentioned the prime locations of air gaps in a room. These are probably doors, vents, windows, power outlets etc. Now, we can’t easily treat them all, but tools do exist to resolve most of them. Doors are especially bad at letting noise enter our homes. We’ve also written a comprehensive guide to treating doors.
Acoustic sealants come in many shapes and forms. They work by filling air gaps with a super dense material that is great at absorbing sound energy. We can use these acoustic sealants to stop noise passing through these “holes” in our room.
These are some common types of acoustic sealant readily available to you at home:
[spacer height=”20px”] Acoustic Caulk
Acoustic caulk is easily applied using its tube. It can be used to seal any holes or cracks in your home. It comes in single packs or huge multi-packs for more liberal use. Once applied to a gap it will take a few days to dry and properly become effective. Sealant like this is commonly used in the building trade where noise is estimated to be a problem for new-builds.
[easyazon_cta align=”none” identifier=”B00MGCRUD0″ key=”wide-orange” locale=”US” tag=”homerecpro-20″]
[spacer height=”20px”] [spacer height=”20px”]
 Acoustic Putty
Acoustic putty is another effective tool for sealing holes. It is a very dense substance that will add a lot of mass to objects. This reduces how effectively sound travels through them. It can easily be molded into any shape and is flame retardant. It’s usually used to cover electrical outlets to reduce any electrical buzz, but it’s perfect for plugging gaps anywhere in the home.
[spacer height=”20px”] [spacer height=”20px”] Door Bottoms
These are attached to the bottom of doors to provide a seal. This stops air from easily passing under the gap at the bottom of a door. They’re easily attached with a few tiny screws. The other bonus with these is that they stop cold draughts from entering a room. They come in a variety of sizes and also in a cheaper plastic version.
[easyazon_cta align=”none” identifier=”B009UWK98M” key=”wide-orange” locale=”US” tag=”homerecpro-20″] [spacer height=”20px”] [spacer height=”20px”]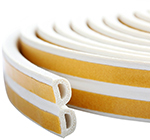 Weather Stripping Seals
These weather stripping seals are ideal for filling gaps in window frames and doors. They have an adhesive backing that allows them to be easily applied without any DIY skills. Like many of these acoustic sealants, they have the added effect of stopping cold draughts too. This treatment is one of the cheapest and can have quite an effect on energy bills and unwanted noise.
[spacer height=”20px”] [spacer height=”20px”][spacer height=”20px”]
2. Adding Mass
For sound to pass through a surface (like a wall), it has to actually move or vibrate the surface ever so slightly.
A heavier wall is harder to move than a light wall right? It sure is, and the same principle applies when soundproofing a room.
If we add mass to an object, we make it much harder for sound to be transmitted through it.
This kind of treatment is more effective for higher frequency sounds (higher pitched). These sounds have less energy than low frequencies and will be absorbed much more effectively by adding extra mass.
Adding mass to a room pre-build is simple. We can use dense materials like concrete for example. Adding mass to a room retrospectively is harder, but tools do exist. Let’s see what we can do.
[spacer height=”20px”]How to Add Mass to a Surface
We want to make a surface (wall, ceiling, floor) as heavy as possible. Common materials for this, that don’t break the bank are plywood, drywall, oriented strand board, and cement board. Drywall is one of the cheapest materials for this. 5/8 inch drywall is commonly used for this purpose, and it can be found at any lumberyard or home center. A readily available material that is designed to reduce sound levels is acoustic vinyl.
[spacer height=”20px”]Acoustic Vinyl
 Acoustic vinyl (or mass loaded vinyl) is a barrier used to block sound between walls, ceilings, floors, pipes and more. It is very dense, weighing one pound per square foot. Besides reducing noise transmitted through walls, it can also be used to make covers or curtains for windows. Windows are a major culprit when it comes to noise leaks.
Mass loaded vinyl is a staple acoustic treatment, but be warned, it doesn’t come cheap!
[easyazon_cta align=”none” identifier=”B008JHE1P6″ key=”wide-orange” locale=”US” tag=”homerecpro-20″] [spacer height=”20px”] [spacer height=”20px”][spacer height=”20px”]
3. Damping Sound
We mentioned in the last section that sound needs to vibrate a surface to travel through it. The more a surface vibrates, the more noise can pass through.
We previously learned how adding mass can restrict how freely a surface vibrates. Another way to do this is to dampen a surface. This is a bit like how the suspension works on a car. A damper material will absorb the vibrations and stop sound from being transmitted via these vibrations.
Materials used for acoustic dampening are designed to transmit vibrations as inefficiently as possible. Again think of the suspension in the car providing a soft, smooth ride when going over hard bumps. These hard bumps are like our unwanted noise vibrations.
It’s easiest to use this technique by placing the dampening buffer between two rigid surfaces that are interacting with each other. By placing a dampening material between them we can inhibit the sound transmission between the surfaces.
So, the aim here is to stop a surface from being able to vibrate freely, and therefore restrict it from transmitting noise.
[spacer height=”20px”]How to Dampen Sound in a Room
By adding a dampening material to the inside of walls, or by hanging a new sound proof wall (see below), we can effectively dampen sound. This is a key treatment when making a soundproof room.
A popular solution is to hang a new wall inside the room (we’ll tell you how to do that further down the page). Using two pieces of drywall, with noiseproofing compound sandwiched in-between, we can make a really effective dampening system.
However, dampening materials can generally be used anywhere where you think an extra layer of sound insulation would be beneficial.
Here are some tools that can help us dampen sound vibrations:
[spacer height=”20px”] Noiseproofing Compound
Green Glue is an extremely effective dampener of sound. It can be used to plug holes but is more commonly used to provide a layer of protection between walls. It is fire resistant, and even effective at reducing those problematic low-frequency noises. It comes in single units or huge multipacks.
[easyazon_cta align=”none” identifier=”B00MGCRUQC” key=”wide-orange” locale=”US” tag=”homerecpro-20″] [spacer height=”20px”] [spacer height=”20px”] Anti-Vibration Pads
Anti vibration pads are the perfect solution for speaker vibrations. Place these under a loudspeaker and you can say goodbye to those annoying noises and vibrations.
Getting complaints from downstairs because the washing machine is too loud? There are anti-vibration pads made specifically for problems with big appliances like these too. They are really effective at stopping vibrations from transferring between floors, and are a great solution for those living in apartments.
[easyazon_cta align=”none” identifier=”B00BVEMLR4″ key=”wide-orange” locale=”US” tag=”homerecpro-20″] [spacer height=”20px”] [spacer height=”20px”][spacer height=”20px”]
4. Decouple Surfaces
Sound is little more than a vibration of particles. When surfaces are in direct contact, then sound can travel more easily between them. If we remove the point of contact then we decouple the surfaces.
Think about the “walkie-talkie” you made as a kid. Two cans joined by a piece of string can transmit sound through the string from one person to the other. Remove that string and we have decoupled the cans.
Decoupling surfaces in a room is probably the hardest soundproofing treatment to implement, but also one of the most effective.
[spacer height=”20px”]How to Decouple Surfaces in a Room
To decouple surfaces in a room we have to isolate the walls, ceiling, or floor. We want to create a “floating” surface, where the contact with the building structure is minimal. By creating an air gap between surfaces, we make it much harder for sound to pass through. The small air gap itself helps stop the sound passing easily.
There are various tools that allow us to create new walls, ceilings, or floors that are decoupled from the building. By attaching a new layer of drywall in this way, we can reduce sound transmission into a room. We have an in-depth guide to soundproofing walls further down the page.
Here are some commonly used tools to help decouple a surface:
[spacer height=”20px”] Resilient Channels
A resilient channel is a special metal bracket that is used to hang an extra layer of drywall on an existing wall. It is specifically designed to reduce sound transmission through a wall or ceiling. By using resilient channels you significantly reduce the amount of direct contact between surfaces and create an effective air gap. These are a must for decoupling walls and ceiling. We’ll talk about these more in the next section about soundproofing walls. They’re a key component in the “floating” wall technique.
[spacer height=”20px”]
[spacer height=”20px”]
 Resilient Sound Isolation Clips
Much like a resilient channel, these sound isolation clips are used to decouple walls and ceilings. They are said to reduce noise transfer by between 75 and 100%. They attach to hat channels or furring strips, to help decouple the surfaces and add damping. There is a similar product called a whisper clip.
[spacer height=”20px”]
[spacer height=”20px”]
 Auralex SheetBlok (mass loaded vinyl)
It’s not cheap, but it’s incredibly effective. This vinyl material is 6dB more effective than lead at stopping the transmission of sound (and a heck of a lot safer!). It is quite thin but very dense. It’s used to help decouple walls, ceilings, and floors. It’s designed to stop sound transmission and you won’t find much else that does it this effectively per unit area and thickness.
[easyazon_cta align=”none” identifier=”B0002D05OG” key=”wide-orange” locale=”US” tag=”homerecpro-20″] [spacer height=”20px”] [spacer height=”20px”]We’ve now looked at the 4 ways of reducing sound coming into and out of a room. Remember, each of these methods can be effective on their own, but a combination would be ideal. Next, we will learn how to use all of these techniques together to soundproof a wall.
[spacer height=”20px”]How to Soundproof a Wall
If you have used some of the techniques in the ‘how to make a room soundproof’ section, but still need more help, then perhaps you need to improve your existing walls.
We are going to learn how to make an effective “floating” wall for a room. This does not alter the structure of your home but adds an extra barrier for sound to pass. If you want to reduce noise transfer through a wall, then this is your most effective solution.
By adding an extra layer of wall to a room like this, you will make the wall around 100mm thicker. This means you will lose a little space, but you can reduce noise that is transferred through the wall by up to 40 decibels (find out more about decibels).
This method of soundproofing is effective in reducing noises like talking, TV, and radio.
[spacer height=”20px”]
A “floating” wall and floor set-up (Source)
To create an effective soundproof wall we need to combine the four techniques learned previously. If you’re unsure about any of the following terminology, then you should read the last section on soundproofing basics. To recap, we need to:
Decouple the wall
Absorb sound
Add mass to the wall
Dampen vibrations
[spacer height=”20px”]
Step 1: Decouple the walls
The first step is to use resilient channel soundproofing (see the last section) to ensure that the surface contact between the structural wall and our new partition wall is minimal. Remember, we don’t want to give the sound vibrations an easy path to travel. By keeping the contact points minimal in an area, we greatly inhibit sound from being transferred.
The resilient channels screw into the original wall at the top and bottom, and then at 24-inch intervals. The resilient channels are the long, horizontal metal strips you see in the picture below.
An alternative set-up would be to use 25 gauge 7/8 hat channel and resilient sound isolation clips. This would have the same effect as the resilient channels. Hat channel is similar to the resilient channel but does not decouple the surfaces. That is why the isolation clips are needed.
If there are electrical outlets on the wall we need to prepare for that. The electrical box will need to extend another couple of inches from the wall. We need to make a good seal around the box with acoustic putty and also seal air gaps at each stage with acoustic caulk.

Installation of resilient channels
[spacer height=”20px”]
Step 2: Absorb Sound
The resilient channels leave a small air pocket between the two walls. If we leave this empty, then the sound will resonate in the air pocket and vibrate our wall. Resonance is not good as it will effectively amplify certain sounds. We want to stop this, so we need to add a thin layer of sound absorbing material. We can use cheaper materials like mineral wool, cellulose, or polyester. But, just remember not to pack it too tightly as this wouldn’t help our cause. If it is packed tightly in the air gap, then it will eliminate all the good work done by the resilient channels in decoupling the walls.
We want to cover the whole wall space with our absorber. It’s very important that the thickness of this absorber is less than that of our resilient channel. We need to leave a small air gap between our surfaces. Otherwise, we might compress the absorber, which will aid sound transmission between the walls. By leaving a small air gap we can reduce even more sound transmission between the walls.
[spacer height=”20px”]
Step 3: Add Mass to the Wall
The next stage is to add our wall. We want to use the heaviest possible material we can. As the heavier it is, the harder it is for sound to vibrate through it. A commonly used material for this is 5/8 inch drywall (commonly found at lumberyards and home centers). We can also use materials like cement board, plywood, and oriented strand board. After hanging the first layer of drywall you should fill any gaps with acoustic caulk.
Ideally, we want to hang two layers of drywall. This is to create a lot of mass in our wall. But, between them, we need another ingredient. This leads us to step four…
[spacer height=”20px”]
Step 4: Dampen Vibrations

Between our layers of drywall, we need to add some acoustic damping. This is to reduce the vibrations that can travel through our 2 layers. As we know, vibrations = sound. Green Glue Noiseproofing Compound is perfect for this and is commonly used in the building trade for this purpose. Liberally apply a layer of this to the first drywall block before attaching the final piece of drywall.
After attaching the drywall/Green Glue/drywall sandwich to the resilient channel we are ready for the finishing touches.
It’s really important to seal any gaps at this stage with some acoustic caulk.
You can finish the wall in any way you like, just remember not to couple the wall again by using long nails. These would give the sound vibrations an easy route to travel again. If you are particularly worried about sound escaping from the room then acoustic panels can be hung. They offer extra sound absorption and aren’t as ugly as you might expect.
[spacer height=”20px”]
You now have an acoustic partition wall or “floating” wall. This could reduce the sound transmitted through the wall by up to 40dB. That is a significant impact, and should all but eliminate noise from the TV, radio or conversations. When deciding how to soundproof your room, this should be a key consideration.
[spacer height=”20px”]
[spacer height=”20px”]
Note:
Before starting the process of soundproofing your room, be aware that cities/states/countries all have regulations regarding what acceptable noise limits are. You can monitor noise levels with a special meter to see if they exceed maximum limits set by your local government. For example, the New York City Noise Code states that music coming from any commercial establishment must not exceed 42 decibels of loudness inside any nearby residences. Sound meters are relatively inexpensive and can be purchased easily on Amazon. Make sure your neighbors are operating within the law before you decide how to soundproof a room.
For a complete room treatment, you should check out our other guides too. Our guides to treating windows and floors are particularly popular.
That brings us to an end of the first part of our ‘How to Soundproof a Room’ guide. You now know the basic techniques to soundproof a room, and also how to soundproof a wall.
To see more articles like this and to be notified when new posts go live here at HomeRecordingPro.com then make sure to follow us on Facebook. There’s a link in the top right corner of the page.
If you have any questions about anything we’ve discussed today then be sure to leave a message down below or over on our contact page. We promise to get back to you promptly.
[spacer height=”20px”]
[spacer height=”20px”]
[spacer height=”20px”]
Image Sources
Hi, my name’s Jamie. I’m a teacher and graduate in acoustics & music. I’m passionate about all things sound related, and I hope that comes across on the website.
Please get in contact if there’s anything we can do to help.


